www.haegi.org

www.haegi.org

  • 27. April 2017

    |

    Projects » SmartSwitch

    clickButton Library for MCP23017

    I had some issues with our implementation of the click detection on the smartswitch. While searching for a better solution I stumbled accross the arduino clickButton library which is already ported to the photon.

    Unfortunately the clickButton library is only working with photon/arduino pins and is not supporting a MCP23017 port extender which is used by the smartswitch. To fix this issue I modified the library for the use of an MCP23017.

    The sources are on github: https://github.com/Trekky12/clickButtonMCP.

  • 16. September 2016

    |

    Projects » OSMC / Ambilight

    Ambilight for all HDMI sources

    Since my ambilight installation is only usable for videos which are played directly from the Raspberry Pi I decided to upgrade the installation to support all HDMI sources.

    Therefore I followed a german tutorial which can be found here: http://powerpi.de/ambilight-fuer-jedes-hdmi-geraet-die-ultimative-schritt-fuer-schritt-anleitung/

    Parts:

    • USB videograbber
    • HDMI 2 AV Converter
    • HDMI-Splitter
    • Cinch-Connector (S-VIDEO)
    • HDMI switch

    Installation:

    • All input sources are connected to the HDMI switch. (computer, Raspberry Pi, cable receiver).
    • The output of the switch is connected to the HDMI-Splitter where one cable is connected to the TV and the other one is connected to the HDMI 2 AV Converter.
    • The HDMI 2 AV Converter converts the input signal to a AV signal which can be read by the USB videograbber.
    • The output of the videograbber can be processed by the Raspberry Pi and the underlying Hyperion instance.
  • 25. August 2016

    |

    Projects » Misc

    Gamepad2Keyboard Mapper for Dosbox on the Raspberry Pi

    To play some old computer games with RetroPie I installed retrosmc on my Raspberry Pi running OSMC.

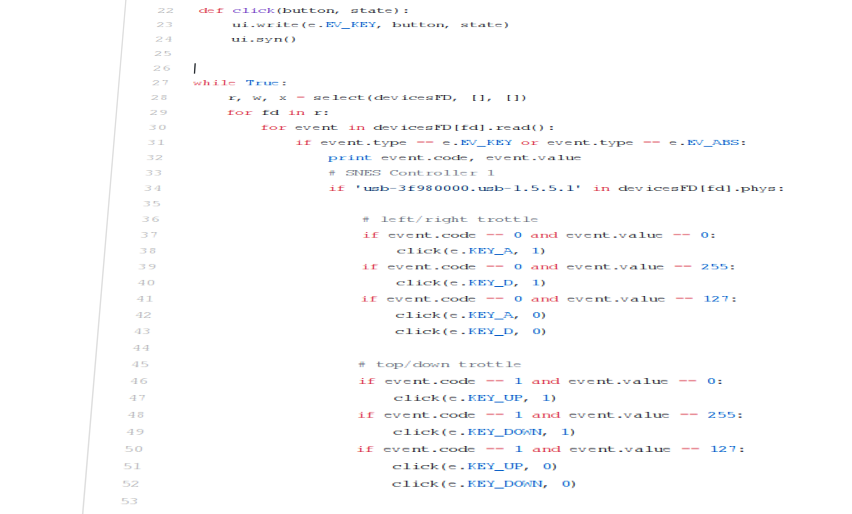
    I was trying to play the retro game “Wacky Wheels” with DOSBox. Unfortunately my USB Gamepads were not able to handle the configuration of the input. So I wrote a small python script which maps gamepad inputs to keyboard inputs.

    The script is shown below. It is executed with the start-script of “Wacky-Wheels” in “/home/osmc/RetroPie/roms/pc”:

    #!/bin/bash
    python /home/osmc/joystick.py &
    JOYSTICK_PID=$!
    /opt/retropie/emulators/dosbox/bin/dosbox -c "mount c /home/osmc/RetroPie/roms/pc" -c "c:" -c "cd WACKY" -c "WW.EXE" -c "exit"
    kill $JOYSTICK_PID
    

    Also it is important to have joysticktype=none in your dosbox-SVN.conf

  • 13. November 2015

    |

    Projects » WordClock

    Photon WordClock

    Recently I received the Particle Photon and developed a WordClock with the help of a WS2812B LED Strip.

    The LEDs are cutted and arranged in a way described in the mikrocontroller.net article. The front plate and the inner grid are laser cutted by formulor.de and inserted in a 23x23cm RIBBA Frame of Ikea. Between the front plate and the inner grid is a white piece of paper to diffuse the light of the LEDs. The LEDs are glued to a Hartschaumplatte and connected to the Particle Photon. For adaptive lightning there is a LDR resistor attached.

    WordClock
    front plate – laser cutted
    inner grid
    inner grid
    WS2812B LEDs

    The source code and the laser cutting template is available on Github.

    Parts:

    • RIBBA 23x23cm frame
    • Particle Spark/Photon
    • WS2812B LED strip, 60 LEDs per meter, min. 97 LEDs
    • laser cutted front plate and inner grid (e.g. formulor/ponoko)
    • LDR
    • 10k resistor
  • 1. November 2015

    |

    Projects » Papers

    Definition und Evaluation eines Convolutional Neural Networks zur Defekterkennung in Bildern (Master-Thesis, german, SS15)

    inaccessible due to cooperation with the Robert Bosch GmbH

«Previous Page
1 … 6 7 8 9 10 … 12
Next Page»